Etter mye planlegging, minst tre måneder med bygging, mange skritt frem og noen tilbake, er vi nå ferdige med det splitter nye bryggeriet til Kristianiastudentenes Haandbryggerlaug!
Det ligger fem teaserbilder i vedlegg til denne tråden. De utålmodige kan gå rett til bildene og bildetekstene på denne lenken: https://picasaweb.google.com/martin.eckhoff.andresen/KSHBSNewBrewery
Resten av beskrivelsen av bryggeriet er på engelsk, fordi jeg kryssposter den samme beskrivelsen til forumet til The Electric Brewery. Dere som ikke kjenner det kan eventuelt ta en titt på The Electric Brewery, siden det er dette systemet vårt bryggeri er inspirert av.
Kritikk, ros, ideer, innspill og kommentarer mottas gjerne!
---
My homebrewing club in Oslo (Norway) is The Oslo Students´ home brewing club. Having started brewing around three years back, brewed at least 150 batches on a home made plastic brewery and learned a lot, we decided earlier this year to build a completely new brewery with the knowledge we now have.
The main criteria for the brewery was the following:
- Flexibility: The brewery shall provide none or very few restrictions to the brewing process or techniques we can utilise (this means having a HERMS or RIMS, among other things)
- Consistency: The brewery should make it easy to replicate beers.
- Cleanliness: easy to clean and easy to keep free from infections
- Easy to use: The brewery will be used by at least 10 different people on a regular basis.
- Robust: The brewery should be fairly robust to withstand the wear and tear of at least weekly brewing
- Price: Yes, originally it was supposed to cost less than 20K NOK, or about 3,400 USD (but remember everything is pricey over here)
After some time of pondering, we decided to build a brewery based upon and inspired by The Electric Brewery. Compared to the basic Electric Brewery build, the main changes in our brewery are:
- built from old stainless water heaters, not kettles, to save money and add the possibility of larger batches (up to 100 L / 25 gallons)
- Runs on two 16A circuits rather than one 32 A circuit, as these are much more readily available in Norway
- Has a separate HERMS kettle, not a HERMS coil in the HLT
- Uses an immersion chiller, not a counterflow chiller
Below you'll find descriptions and photos of each element in the brewery:
THE CONTROL PANEL
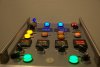
As mentioned, the control panel is based on The Electric Brewery's panel. However, the design choice of running on 2x 16A rather than 1x 32A makes the panel quite a lot more complicated. In addition to the choice of using a separate HERMS, thus increasing the need for elements and SSRs, this takes the panel from 3 to 7 normal relays and 2 to 5 SSRs. In addition, you have two separate circuits to keep track of, making the chance of mistakes so much more likely, especially in Norway where polarity is impossible to distinguish. Note specifically that the power transformer providing the amperemeter with power CAN NOT get it's power from another circuit than the one measured by the amperemeter. This gave us quite a lot of trouble, but we eventually figured it out.")
As you can see below, we had no room for the voltmeters in our (too small!) enclosure. Power is very stable in Norway anyway, so I don't think it's a problem. We also had to change the element select 1 to a 5-way switch to accomodate the HERMS element, but this also leaves one NO contactor open for the safe start interlock without piggybacking another NC contactor, which isn't possible anyway with the 5-way switch.
Since we had them laying around, we also mounted an automatic fuse on each of the circuits inside the control panel. As these are quicker to trip than the main fuses in the building were we brew, the hope is that these should trip first, giving us another layer of security. We brew in a public student house, and access to the main fuses is a bit troublesome.
The panel is mounted on TV/flatscreen mounting arm so that it can extend a bit out from the wall during operation. ***This did not work very well as the panel was too heavy***
All in all, we're really happy with the control panel.
THE HOT LIQUOR TANK
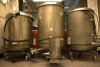
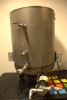
All the kettles are built from old refurbished water heaters. They are stainless, very solid, and easy to get hold of. We simply went to a plumbing parts supplier who had a container where the plumbers deposit old water heaters outside, and could take anything we wanted. We went through quite a lot of heaters before finding some we liked, but eventually settled on a produser called OSO. They have three legs that are welded on directly to the tank, making mounting of wheels easy. As you can see from the pictures, a small frame has been mounted underneath the feet to keep them stable, then wheels have been screwed on underneath. On the stainless rails making up the frame, we've also mounted a pump.
The tanks are cut using an angle grinder, then sanded to make sure none of the edges are sharp. For most of the tanks, there are often holes in them from before, sometimes in places where you don't need a hole. Sometimes, the holes fit perfectly for an element, sometimes we expanded the holes to fit an element, and sometimes we had to close the holes altogether. This was done by cutting a small piece of stainless from some scraps of a water heater, then drilling a hole in each corner and four holes around the main hole in the tank itself. Then the "patch" was attached to the tank using four bolts and nuts, with silicone o-rings around the bolts between the patch and the tank, and a large silicone o-ring encircling the main hole you want to close, again between the patch and the tank itself. Then screw the bolts and nuts on really tight. So far, this seems to be tight and leak-free, even when boiling.
Please beware that most water heaters are relatively thick-walled - ours were 1,75 mm or 2mm or even a little more. This is a bit too thick for example for the hole punches, so we broke a lot of bolts during the process. Be careful, try to apply the pressure as evenly as possible and buy extra bolts for the hole punches. You'll also need a lot of high quality stainless steel drills - we used some called Zebra or HSCO drills that we bought at Würth. Go slowly, apply quite a lot of pressure and use cutting oil.
The HLT is approximately 120 liters, contains 2x 3,5kW ultra low-watt density elements, a water output with a diptupe on the inside that extends all the way to the bottom of the tank, and a water return valve for filling the tank and circulating the water.
All parts are stainless. The pump is a Chugger pump.
THE MASH/LAUTER TUN
Similarly to the HLT, the MLT is an refurbished hot water tank. The stand is made similarly, but the tank is larger, around 150 liters. In the bottom, we've fitted a round sheet of perforated stainless steel with 2mm holes (I think), this is used for lautering. The plate was bought as a 50cm x 50cm piece, then cut using an angle grinder, sanded and mounted with handles for removal.
In the top, we have a return manifold. We didn't like so much the silicone hose in the mash-solution from the original Electric Brewery build, so we rather mounted a fixed ring of stainless tube that we drilled a lot of holes thorugh. The idea is to spread the wort over the grains using this manifold. We are a bit afraid of hot-side aeration, but some brewers assured us it's no problem. Anyway, we drilled the holes mainly inwards, towards the kettle wall, so that the wort will drip down along the sides of the kettle during sparging. We hope this will not lead to poor efficiency due to uneven sparging of the grains - we have wort above the grain level 95% of the time during sparging anyways. If it does, we'll need to make some adjustments.
The MLT has an bottom output drain and a return valve attached to the manifold on top.
Similarly to the way the pump is attached to the HLT, the HERMs is attached to the MLT.
THE HERMS TANK
We did not particularly like the combined HLT/HERMS solution of the original Electric Brewery. There are two main reasons for that:
- As far as I understand, you have to heat all the brewing water before starting the mash, as you cannot heat water in the HLT and use the HERMS at the same time. This prolongs the brew day quite a lot.
- We think you'll get faster response times to temperature changes in a smaller HERMS - heating 50 liters of water takes some time.
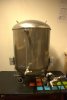
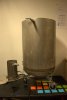
Therefore, we've made a separate HERMS tank. It's made from a stianless steel tube of 6" / 16cm diameter and height 10"/25cm. Inside, we've attached a coil of around 5m of stainless steel 1/2" OD tube. There's also a 3,5kW element. This element heats the water in the tank, and the hot water gently heats the wort passing through the coil.
***Coiling 1/2" stainless steel tube is a nightmare, especially if you want a 13-14 cm diameter. DO NOT try this unless you have special equipment, that is a tube roller, not a tube bender. It's simply not gonna work. We hade excellent help from Per Otto Vangsnes, a really helpful guy who did the rolling for us.***
We've pondered also using the HERMS tank as a pre-chiller, passing cold water through the chamber as the wort passes the other way, but haven't gotten there yet. We'll see whether it's needed.
The HERMS is closed in the bottom by welding it to some scrap stainless steel - actually the top of one of the water heaters we used for the other tanks. This is the only place in the whole build where we welded, but we really didn't see any other way to do it. We don't know how to weld, but got my father to help us out with this part.
THE BOIL KETTLE
The boil kettle is made very similarly to the HLT, however it's a bit larger (around 130L) to have more room to avoid boil-overs. There is a dump valve in the bottom (1" for cleaning and getting rid of all the hop compounds after finishing the beer) and there's an output valve on the side with a diptube extending down to the side of the tank so as not to drain the hop compounds, only the wort. There's also two wort return valves, one for 50L batches and one for 100L batches. These make the whirlpool during the cooling.
The boil kettle is also mounted with a pump on the stand like the HLT. This is a March 809 pump with a Chugger stainless steel housing.
THE LIDS
Lids are fashioned out of the tops of water heaters. We were lucky enough to find two heaters with larger radius than the ones we used for the tanks, so that they'll fit around the tanks.
THE IMMERSION CHILLER
We like immersion chillers. We've always used them, and I think it's something reassuring of being able to see the dirt on it if it's not clean. They're also very easy to clean but putting them in the BK 15 mins before use. We do not like plate chillers, as we do not use a hop filter. Although a counterflow chiller could have been a possibility, the thought of using copper in our otherwise STAINLESS brewery bothered us so much we decided to stick with immersion chilling.
Because we had a too little room above the heating elements and below the 50L-mark in the boil kettle, we had to coil the stainless steel tube in three separate coils, one inside the other. These were then soldered to 1/4" BSPP 90 degree elbows with the threads drilled out, and then soldered to thicker-walled, straight 1/2" OD coils to extend all the way up to the lid. The chiller itself thus hangs in one of the lids. We haven't tried this yet, so it remains to be seen how it works. The chiller is around 22-23m long, which is all that was left of our 100 feet coil after making the HERMS, manifold and some dip tubes. We hope it'll chill fast enough.
***The immersion chiller is not completed yet, so no pictures, sorry***
A NOTE ON 100L BATCHES
We originally planned for a 50L brewery (around 13 gallons), but after settling on the water heater as kettles-solution, we saw that expanding to 100L really was no more work, so we decided to do that.
However, we're a bit short on power when brewing 100L batches. When the HERMS is running during the mash, we have only one 3,5kW element to use to heat the sparge water. It will take quite some time to heat 100L of sparge water with 3,5 kW. Our solution to this is a combination of
- Heating more water for strike water before mashing, and combining these extra 20-30 liters of hot water with cold water to start with a warmer sparge water, thus lowering heating times.
- Not using the HERMS all the time during the mash, but switching it on and off every 5-10 minutes to allow using two elements for heating sparge water some of the time.
HEATING TIMES
We performed a preliminary test of heating water in the boil kettle using 2x 3,5kW elements. Heating times are as follows:
50 liters of water (13 gals): 13-71 degrees C in 37 minutes, or 38,3 seconds per degree
100 liters of water (25-26 gals): 3 degrees in around 4 minutes, or around 80 seconds per degree.
This was without any insulation of the kettles. We plan on making some easily removable insulation jackets for the kettles to lower heating times during large batches
LAST NOTES
All kettles have been treated with nitric acid after they were finished, to re-passify the stainless steel. This is especially important around the places where you have cut, sanded, drilled, scratched or otherwise worked on the metal if you want to avoid rusty beer.
All in all, the brewery has taken around half a year to build, including pondering, research, ordering of parts and so on. I estimate that I've used at least 1 month of full time work on this, and my other main partner has spent maybe two weeks. We would have done it a lot faster if we would do it again, mainly because we've learned so much about metalworking during the process.
Cost-wise, we ended up spending around 30 000 NOK, or around 5 000 USD. However, please beware that everything is much more expensive over here than in the US. This excludes one of the pumps that we had from before and only bought a new SS housing for, and does not include grain mill or fermentation vessels. To give you an idea of relative price, a Speidel 50L, a complete brewing machine, is around 20 000 NOK including a chiller. I think we got a lot more bang for the buck with our build than a Speidel, but obviously they are two completely different things. If I'd do it again, I could probably do it a little cheaper because I'd avoid buying a lot of parts I ended up not using anyway.
Thanks to Per Otto Vangsnes, Bjørn Ivar Katla, Terje Andresen and the Norbrygg forum for a lot of help and tips during the build.
So, that's our brewery. What do you think?
Det ligger fem teaserbilder i vedlegg til denne tråden. De utålmodige kan gå rett til bildene og bildetekstene på denne lenken: https://picasaweb.google.com/martin.eckhoff.andresen/KSHBSNewBrewery
Resten av beskrivelsen av bryggeriet er på engelsk, fordi jeg kryssposter den samme beskrivelsen til forumet til The Electric Brewery. Dere som ikke kjenner det kan eventuelt ta en titt på The Electric Brewery, siden det er dette systemet vårt bryggeri er inspirert av.
Kritikk, ros, ideer, innspill og kommentarer mottas gjerne!
---
My homebrewing club in Oslo (Norway) is The Oslo Students´ home brewing club. Having started brewing around three years back, brewed at least 150 batches on a home made plastic brewery and learned a lot, we decided earlier this year to build a completely new brewery with the knowledge we now have.
The main criteria for the brewery was the following:
- Flexibility: The brewery shall provide none or very few restrictions to the brewing process or techniques we can utilise (this means having a HERMS or RIMS, among other things)
- Consistency: The brewery should make it easy to replicate beers.
- Cleanliness: easy to clean and easy to keep free from infections
- Easy to use: The brewery will be used by at least 10 different people on a regular basis.
- Robust: The brewery should be fairly robust to withstand the wear and tear of at least weekly brewing
- Price: Yes, originally it was supposed to cost less than 20K NOK, or about 3,400 USD (but remember everything is pricey over here)
After some time of pondering, we decided to build a brewery based upon and inspired by The Electric Brewery. Compared to the basic Electric Brewery build, the main changes in our brewery are:
- built from old stainless water heaters, not kettles, to save money and add the possibility of larger batches (up to 100 L / 25 gallons)
- Runs on two 16A circuits rather than one 32 A circuit, as these are much more readily available in Norway
- Has a separate HERMS kettle, not a HERMS coil in the HLT
- Uses an immersion chiller, not a counterflow chiller
Below you'll find descriptions and photos of each element in the brewery:
THE CONTROL PANEL
As mentioned, the control panel is based on The Electric Brewery's panel. However, the design choice of running on 2x 16A rather than 1x 32A makes the panel quite a lot more complicated. In addition to the choice of using a separate HERMS, thus increasing the need for elements and SSRs, this takes the panel from 3 to 7 normal relays and 2 to 5 SSRs. In addition, you have two separate circuits to keep track of, making the chance of mistakes so much more likely, especially in Norway where polarity is impossible to distinguish. Note specifically that the power transformer providing the amperemeter with power CAN NOT get it's power from another circuit than the one measured by the amperemeter. This gave us quite a lot of trouble, but we eventually figured it out.
As you can see below, we had no room for the voltmeters in our (too small!) enclosure. Power is very stable in Norway anyway, so I don't think it's a problem. We also had to change the element select 1 to a 5-way switch to accomodate the HERMS element, but this also leaves one NO contactor open for the safe start interlock without piggybacking another NC contactor, which isn't possible anyway with the 5-way switch.
Since we had them laying around, we also mounted an automatic fuse on each of the circuits inside the control panel. As these are quicker to trip than the main fuses in the building were we brew, the hope is that these should trip first, giving us another layer of security. We brew in a public student house, and access to the main fuses is a bit troublesome.
The panel is mounted on TV/flatscreen mounting arm so that it can extend a bit out from the wall during operation. ***This did not work very well as the panel was too heavy***
All in all, we're really happy with the control panel.
THE HOT LIQUOR TANK
All the kettles are built from old refurbished water heaters. They are stainless, very solid, and easy to get hold of. We simply went to a plumbing parts supplier who had a container where the plumbers deposit old water heaters outside, and could take anything we wanted. We went through quite a lot of heaters before finding some we liked, but eventually settled on a produser called OSO. They have three legs that are welded on directly to the tank, making mounting of wheels easy. As you can see from the pictures, a small frame has been mounted underneath the feet to keep them stable, then wheels have been screwed on underneath. On the stainless rails making up the frame, we've also mounted a pump.
The tanks are cut using an angle grinder, then sanded to make sure none of the edges are sharp. For most of the tanks, there are often holes in them from before, sometimes in places where you don't need a hole. Sometimes, the holes fit perfectly for an element, sometimes we expanded the holes to fit an element, and sometimes we had to close the holes altogether. This was done by cutting a small piece of stainless from some scraps of a water heater, then drilling a hole in each corner and four holes around the main hole in the tank itself. Then the "patch" was attached to the tank using four bolts and nuts, with silicone o-rings around the bolts between the patch and the tank, and a large silicone o-ring encircling the main hole you want to close, again between the patch and the tank itself. Then screw the bolts and nuts on really tight. So far, this seems to be tight and leak-free, even when boiling.
Please beware that most water heaters are relatively thick-walled - ours were 1,75 mm or 2mm or even a little more. This is a bit too thick for example for the hole punches, so we broke a lot of bolts during the process. Be careful, try to apply the pressure as evenly as possible and buy extra bolts for the hole punches. You'll also need a lot of high quality stainless steel drills - we used some called Zebra or HSCO drills that we bought at Würth. Go slowly, apply quite a lot of pressure and use cutting oil.
The HLT is approximately 120 liters, contains 2x 3,5kW ultra low-watt density elements, a water output with a diptupe on the inside that extends all the way to the bottom of the tank, and a water return valve for filling the tank and circulating the water.
All parts are stainless. The pump is a Chugger pump.
THE MASH/LAUTER TUN
Similarly to the HLT, the MLT is an refurbished hot water tank. The stand is made similarly, but the tank is larger, around 150 liters. In the bottom, we've fitted a round sheet of perforated stainless steel with 2mm holes (I think), this is used for lautering. The plate was bought as a 50cm x 50cm piece, then cut using an angle grinder, sanded and mounted with handles for removal.
In the top, we have a return manifold. We didn't like so much the silicone hose in the mash-solution from the original Electric Brewery build, so we rather mounted a fixed ring of stainless tube that we drilled a lot of holes thorugh. The idea is to spread the wort over the grains using this manifold. We are a bit afraid of hot-side aeration, but some brewers assured us it's no problem. Anyway, we drilled the holes mainly inwards, towards the kettle wall, so that the wort will drip down along the sides of the kettle during sparging. We hope this will not lead to poor efficiency due to uneven sparging of the grains - we have wort above the grain level 95% of the time during sparging anyways. If it does, we'll need to make some adjustments.
The MLT has an bottom output drain and a return valve attached to the manifold on top.
Similarly to the way the pump is attached to the HLT, the HERMs is attached to the MLT.
THE HERMS TANK
We did not particularly like the combined HLT/HERMS solution of the original Electric Brewery. There are two main reasons for that:
- As far as I understand, you have to heat all the brewing water before starting the mash, as you cannot heat water in the HLT and use the HERMS at the same time. This prolongs the brew day quite a lot.
- We think you'll get faster response times to temperature changes in a smaller HERMS - heating 50 liters of water takes some time.
Therefore, we've made a separate HERMS tank. It's made from a stianless steel tube of 6" / 16cm diameter and height 10"/25cm. Inside, we've attached a coil of around 5m of stainless steel 1/2" OD tube. There's also a 3,5kW element. This element heats the water in the tank, and the hot water gently heats the wort passing through the coil.
***Coiling 1/2" stainless steel tube is a nightmare, especially if you want a 13-14 cm diameter. DO NOT try this unless you have special equipment, that is a tube roller, not a tube bender. It's simply not gonna work. We hade excellent help from Per Otto Vangsnes, a really helpful guy who did the rolling for us.***
We've pondered also using the HERMS tank as a pre-chiller, passing cold water through the chamber as the wort passes the other way, but haven't gotten there yet. We'll see whether it's needed.
The HERMS is closed in the bottom by welding it to some scrap stainless steel - actually the top of one of the water heaters we used for the other tanks. This is the only place in the whole build where we welded, but we really didn't see any other way to do it. We don't know how to weld, but got my father to help us out with this part.
THE BOIL KETTLE
The boil kettle is made very similarly to the HLT, however it's a bit larger (around 130L) to have more room to avoid boil-overs. There is a dump valve in the bottom (1" for cleaning and getting rid of all the hop compounds after finishing the beer) and there's an output valve on the side with a diptube extending down to the side of the tank so as not to drain the hop compounds, only the wort. There's also two wort return valves, one for 50L batches and one for 100L batches. These make the whirlpool during the cooling.
The boil kettle is also mounted with a pump on the stand like the HLT. This is a March 809 pump with a Chugger stainless steel housing.
THE LIDS
Lids are fashioned out of the tops of water heaters. We were lucky enough to find two heaters with larger radius than the ones we used for the tanks, so that they'll fit around the tanks.
THE IMMERSION CHILLER
We like immersion chillers. We've always used them, and I think it's something reassuring of being able to see the dirt on it if it's not clean. They're also very easy to clean but putting them in the BK 15 mins before use. We do not like plate chillers, as we do not use a hop filter. Although a counterflow chiller could have been a possibility, the thought of using copper in our otherwise STAINLESS brewery bothered us so much we decided to stick with immersion chilling.
Because we had a too little room above the heating elements and below the 50L-mark in the boil kettle, we had to coil the stainless steel tube in three separate coils, one inside the other. These were then soldered to 1/4" BSPP 90 degree elbows with the threads drilled out, and then soldered to thicker-walled, straight 1/2" OD coils to extend all the way up to the lid. The chiller itself thus hangs in one of the lids. We haven't tried this yet, so it remains to be seen how it works. The chiller is around 22-23m long, which is all that was left of our 100 feet coil after making the HERMS, manifold and some dip tubes. We hope it'll chill fast enough.
***The immersion chiller is not completed yet, so no pictures, sorry***
A NOTE ON 100L BATCHES
We originally planned for a 50L brewery (around 13 gallons), but after settling on the water heater as kettles-solution, we saw that expanding to 100L really was no more work, so we decided to do that.
However, we're a bit short on power when brewing 100L batches. When the HERMS is running during the mash, we have only one 3,5kW element to use to heat the sparge water. It will take quite some time to heat 100L of sparge water with 3,5 kW. Our solution to this is a combination of
- Heating more water for strike water before mashing, and combining these extra 20-30 liters of hot water with cold water to start with a warmer sparge water, thus lowering heating times.
- Not using the HERMS all the time during the mash, but switching it on and off every 5-10 minutes to allow using two elements for heating sparge water some of the time.
HEATING TIMES
We performed a preliminary test of heating water in the boil kettle using 2x 3,5kW elements. Heating times are as follows:
50 liters of water (13 gals): 13-71 degrees C in 37 minutes, or 38,3 seconds per degree
100 liters of water (25-26 gals): 3 degrees in around 4 minutes, or around 80 seconds per degree.
This was without any insulation of the kettles. We plan on making some easily removable insulation jackets for the kettles to lower heating times during large batches
LAST NOTES
All kettles have been treated with nitric acid after they were finished, to re-passify the stainless steel. This is especially important around the places where you have cut, sanded, drilled, scratched or otherwise worked on the metal if you want to avoid rusty beer.
All in all, the brewery has taken around half a year to build, including pondering, research, ordering of parts and so on. I estimate that I've used at least 1 month of full time work on this, and my other main partner has spent maybe two weeks. We would have done it a lot faster if we would do it again, mainly because we've learned so much about metalworking during the process.
Cost-wise, we ended up spending around 30 000 NOK, or around 5 000 USD. However, please beware that everything is much more expensive over here than in the US. This excludes one of the pumps that we had from before and only bought a new SS housing for, and does not include grain mill or fermentation vessels. To give you an idea of relative price, a Speidel 50L, a complete brewing machine, is around 20 000 NOK including a chiller. I think we got a lot more bang for the buck with our build than a Speidel, but obviously they are two completely different things. If I'd do it again, I could probably do it a little cheaper because I'd avoid buying a lot of parts I ended up not using anyway.
Thanks to Per Otto Vangsnes, Bjørn Ivar Katla, Terje Andresen and the Norbrygg forum for a lot of help and tips during the build.
So, that's our brewery. What do you think?